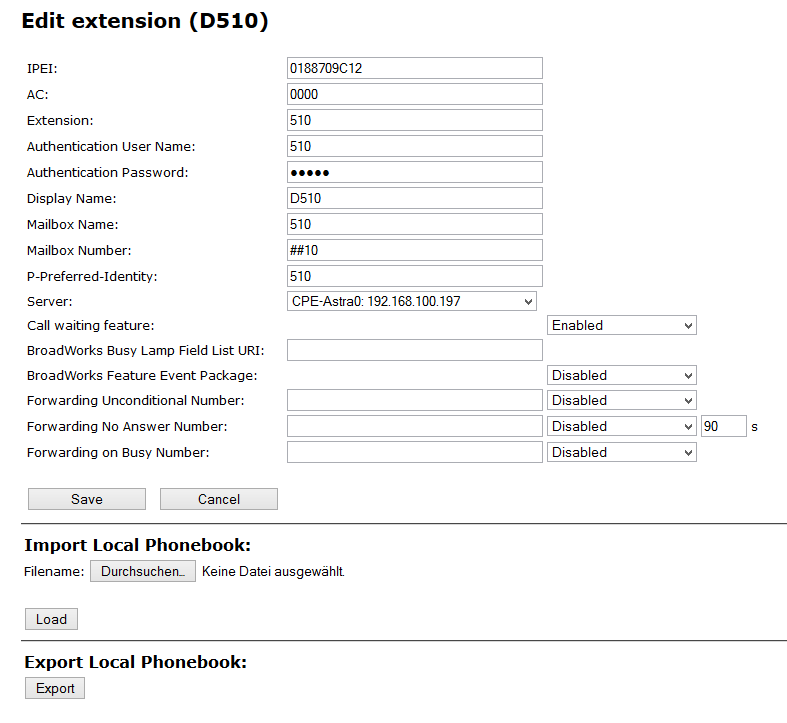
SwyxDECT 500 System Configuration of a SwyxDECT 500 base station Settings at the webinterface Users
 
Users
Under the menu item "Extensions", the following settings are possible:
*Add and edit users
*Display all of the system's registered users
*Set the base station to log-on mode to log on handsets. For further information please refer to How to connect SwyxPhone D510 with SwyxDECT 500.
*Select registered users to delete or deregister handsets
Parameter
Description
IPEI
(International Portable Equipment Identifier) Serial number of the DECT handset.
The IPEI number is set for every handset by the manufacturer and can be seen in the menu of the SwyxPhone D510 under "Settings | Status".
Authorization Code
a number with 4 digits, which you assign to the user´s handset for the registration at a base station.
Extensions
SIP user ID you entered into the user's properties on the SwyxWare-Administration.
User Name Authentication
SIP user name you entered in the user's properties on the SwyxWare-Administration.
Password Authentication
Password you entered in the user's properties on the SwyxWare-Administration.
Display Name
Additional designation appearing on the handset's display.
Mail box Name
Numbers of User
Mail box number
Here you can e.g. enter the function code for remote query (##10).
P-preferred-identity (Sender number)
Here you can enter further numbers additionally to the own number of the user (e.g. "234;220;478" for an internal number, a group number and an alternative number). Subsequently the user can decide for every external call with the selection of the desired line, which number he wants to signal.
Servers
SwyxServer IP address; various servers can be selected.
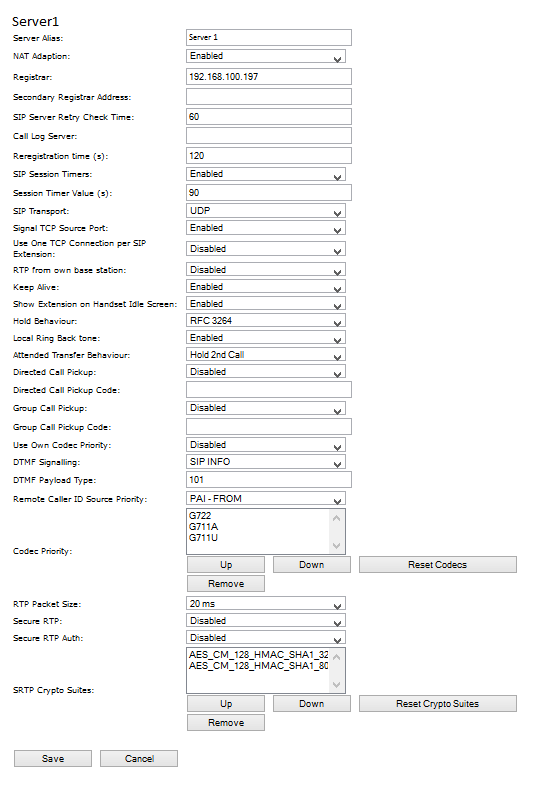
Add user
Before registration of the new user please keep at hand the serial number (IPEI) of the concerning handset ready. The serial number can be displayed in the menu of SwyxPhone D510 under "Settings | Status".
How to add a new user
1. Select the "Extensions" option in the menu bar.
2. Click on "Add extensions."
3. Enter in the field "IPEI" the serial number of the handset.
4. Enter in the field "AC" the 4 digits number, which is used to identify the user (handset) for the registration at the base station.
5. Enter the number in the "SIP User" field and the SIP user name in the "Authentication Name" field that you also assigned on the SwyxServer during the SIP registration (see also chapter The "SIP" Tab).
6. Under "Authentication Password" enter the SIP password that you also assigned in SwyxServer during SIP registration.
7. In the "display information" field, enter the name that should appear on the user's SwyxPhone D510 display.
8. Enter the phone number in the field "Mailbox Name".
9. You can use the "Mailbox Number" field, e.g. to enter the function code for remote query (##10).
10. In the "Server" field, select the SwyxServer on which the user is configured.
11. Click on "Save."
12. Select the desired user.
13. Click on "Log-on handsets".
The log-on mode for the base station is enabled.
14. Log the SwyxPhone D510 of the user just added onto the base station while the base station is still in log-on mode chapter Log on SwyxPhone D510/SwyxPhone D565 to SwyxDECT 500.
Servers
Function
Description
Server Alias
You can enter a name for the server which consists of 10 characters max.
NAT Adaption
When this option is activated, all SIP messages are forwarded directly to the NAT gateway on the SIP aware router. The standard setting for this option is activated.
Registrar
SwyxServerIP-adress
Secondary Registrar Address
IP address of the standby server
SIP Server Retry Check Time
The interval (in seconds) for identifying the active server on a standby system.
Registration time (s)
The time frame (in seconds) for renewed SIP registration of the base station on SwyxServer.
RTP from own basestation
If activated, only the base station, on which the User is logged on, will be used for data transfer to the outside. (This options will only make sense in case of an not optimal use to capacity of the network).
Keep Alive
This option defines the time frame for opening ports on relevant NAT aware routers.
Display extension on handset (in idle state)
Show own extension on the headset.
Use Own Codec Priority
If activated, the codec priority of the base station will be preferred to the code priority of the servers.
DTMF Signalling
Method for signaling keys being pressed during a conversation.
Codec priority
Selection of the codec priority that the base station should use for audio compression and transmission. You set the order using the buttons "up" and "down."
RTP Packet Size
The setting schoud be changed only after consulting the support service.
How to add a new server
1. In the menu bar, click on "Extensions | Servers".
2. Choose "add server."
3. Enter the SwyxServer's IP address in the "Registrar" field.
4. If you are using a standby server, enter the standby server's IP address in the "secondary registrar address:" field.
5. Activate "SIP Session Timers."
6. Enter the value "90" in the "SessionTimer Value" field.
7. Select "SIP INFO" in the "DTMF signalization" field.
* 
In order to support Codec G.729, an optional module for the base station is required (one module per base station). The codec G.729 should be placed after codec G.711U in the priority list.
8. Confirm the entry by clicking on "save".
Repeaters
The "repeater" area can be used to extend the range of your base stations by installing additional repeaters (up to 100 repeaters per system). Up to three repeaters per base station and up to three repeaters on one chain can be used. Up to five (with G.711 five, with G.729 five, with G.722 two) simultaneous calls per repeater possible.
How to add a repeater
1. Select the "Extensions | Repeaters" option.
2. Select "Add Repeater".
3. In the field "DECT snyc mode", select "Manually".
4. Establish the DECT synchronization source.
5. Click on "Save."
6. The repeater is listed.
7. Select the repeater being registered by setting a check mark.
8. Click on "register repeater."
9. Connect the repeater to a power socket.
10. Press the button located on the repeater.
11. After a few seconds, the repeater's light will be light up in green.
12. Update the base station's web page, and the repeater will be displayed in the list.
* 
Avoid registering repeaters and headsets simultaneously, for this may result in interference effects.