19.5 Configuring a SIP Gateway Trunk
When you have created a SIP gateway trunk as described in 19.4 Creating a SIP Gateway Trunk, you can subsequently change the settings of this trunk in the SwyxWare Administration.
When parameters of a trunk are changed, this change takes effect at once. There is no need to halt and restart any services for this.
How to configure a SIP gateway trunk
Any changes to the configuration of a SIP gateway trunk must also be made in the configuration of the gateway.
The "General" Tab
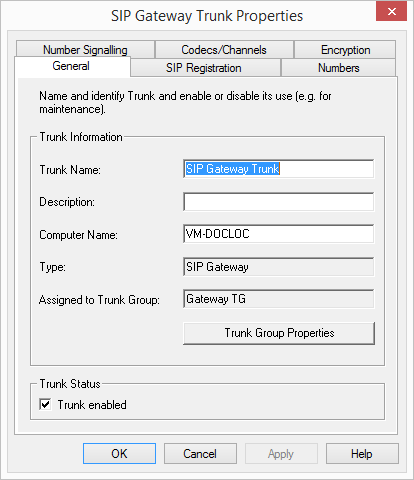
In this tab you can modify the name and description of the trunk.
Trunk information:
In the fields "Trunk Name" and "Description" you will find the descriptive information that is displayed in Administration.
The field "Computer Name" contains the name of the computer in which the service (LinkManager or SwyxGate) is installed.
The "Type" field indicates the type of the trunk, and "Trunk Group" the assigned Trunk Group. Both parameters cannot be retrospectively changed.
Using "Trunk Group Properties..." You will open the Properties of the according Trunk Group. You can edit the Properties of the Trunk Group directly.
Trunk status:
If you deactivate the checkbox "Trunk enabled", this gateway is blocked for further incoming or outgoing calls.
It won't be written in the change log, if a trunk was activated or deactivated.
The "SIP Registration" Tab
The SIP access parameters of the gateway, which the latter will use to establish a connection to the SwyxServer, appear on this tab.
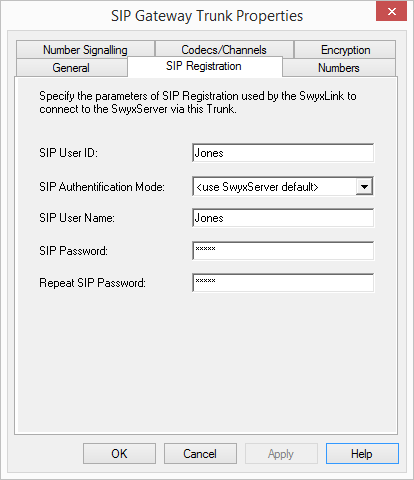
Enter the parameters the SIP gateway needs to log on to SwyxServer via this trunk.
The user ID is combined with the realm to create the SIP address (URI).
Indicate whether or not the gateway needs to authenticate itself.
The user name and password are required for authentication.
The "Numbers" Tab
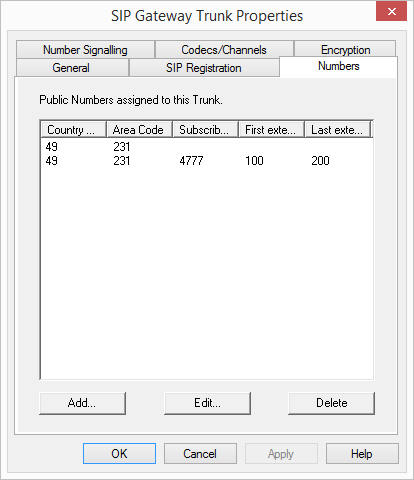
The following settings can be made:
Public numbers of this trunk
You can specify here which public numbers this trunk uses. External calls to these numbers go over this trunk. Calls with a Calling Party Number that is assigned to this trunk are routed over this trunk.
To ensure the unambiguity of the information, you must enter the complete phone number from SwyxWare V.13.20 onwards. In the new "Subscriber number" input field, enter the part of the phone number that follows the area code and precedes the extension (internal phone number).
Country code | Area code | Subscriber number | First extension | Last extension | |
|---|---|---|---|---|---|
e. g. | 49 | 231 | 4777 | 100 | 200 |
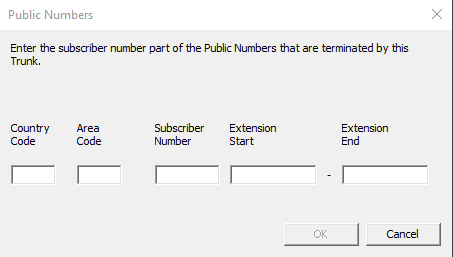
This is how you add numbers for this trunk
The existing phone number entries are automatically extended by the new entry field "Subscriber number" when updating to V.13.20. Make sure that the automatic allocation is correct and adjust the corresponding entries manually as required.
"Number signaling" tab
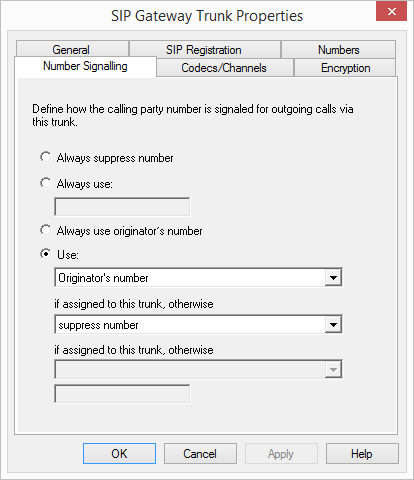
The following settings can be made:
In this case no number is signaled to the person being called (XXX), regardless of which number was configured for this trunk.
In Germany, the destination numbers 110 and 112 are reserved for emergency calls. The outgoing call number to these destination numbers is always signaled.
You can specify a number or SIP-URI here which will always be signaled to the person being called (e.g. the operator's number), regardless of which number was configured for this trunk.
The number must be entered in canonical number format.
Although the caller number is not configured for this trunk, the caller number is signaled to the person being called.
Example:
Customer A (number 88 333 44) calls employee B (number 55 666 77). Forwarding to his mobile phone is activated, i. e. an incoming call is routed outwards again. If the customer's number (88 333 44) should also be signaled externally, then this can be allowed here, although this number was not defined for this trunk.
You can specify here which number this trunk uses. You can specify the action for numbers that are assigned to this trunk as well as for numbers which have no assignment.
Use: | If assigned to this trunk, otherwise: | If assigned to this trunk, otherwise: | Entry |
|---|---|---|---|
Origination Number | Number of the transferor | ||
Hide number | |||
Don't use this trunk | |||
Use the following number | <Number> | ||
Number of the transferor | Origination Number | Hide number | |
Don't use this trunk | |||
Use the following number | <Number> | ||
Hide number |
For Number Signalling, the line characteristic "Clip no Screening" must be enabled on the line, otherwise the number is suppressed.
The "Codecs/Channels" Tab
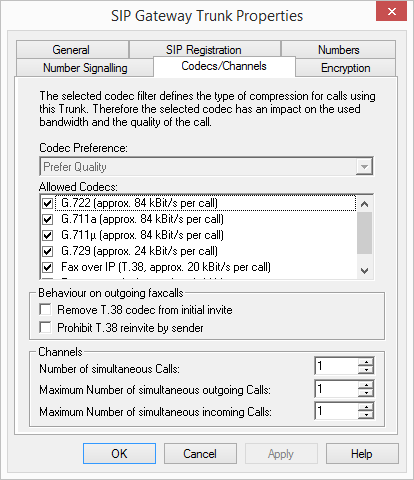
The following settings can be made:
Codecs
Here you can define the type of compression to be used on this connection.
Specify which Codecs should be permitted for this trunk.
High compression. A voice connection requires approximately 24 kbits/s.
HD quality
The voice data is slightly compressed. This keeps the packet delay time in the LAN (Local Area Network) to a minimum. A voice connection requires approximately 64 kbits/s.
In this case, the special fax protocol T.38 is used, which takes the set-up of the IP network into consideration. A fax connection using T.38 requires approximately 20 kbits/s.
If there are several voice codecs selected, SwyxServer will filter voice data according to the current settings. The communicating sides will have to decide which voice codec to use.
It won't be written in the change log, if a Codec was activated or deactivated. See 7.7 Change log.
Action on fax receipt
When a fax connection is set up, the T.38 protocol is negotiated between the two devices involved. Certain variants of this negotiation may not be supported by some IP adapters. Use the following filter options to establish compatibility with such devices.
Some IP adapters cannot correctly interpret an initial connection request which includes T.38 as well as voice Codecs.
If this option is set, SwyxServer removes T.38 from the initial connection request. The fax devices first set up a voice connection and then switch to the fax protocol T.38 because of the fax tone (CED tone, 2100Hz).
The receiving fax device switches to T.38 after detecting the fax tone (CED tone, 2100Hz). Alternatively, the switch to T.38 can be carried out by the sending fax device.
Some IP adapters don't support switching by the sender.
If this option is set, SwyxServer suppresses a switch to T.38 by the sender.
If the receiving side involves a combined phone/fax device (fax switch), a fax data transmission is impossible when the option "Prohibit T.38 reinvite by sender" is activated.
The filter options can only be set when the Codec "Fax over IP (T.38...)" is activated.
Channels
Specify how many channels (connections) should be routed simultaneously via this trunk and forwarded from there to the public network. You can also determine how many outgoing and/or ingoing connections are established at most.
The maximum number is determined by the gateway used.
If channels were added or removed, you will find these changes in the change log.
See also 7.7 Change log.
The "Encryption" tab
You can specify here how and whether voice data going via this trunk should be encrypted.
Encryption mode
This is where you specify the mode of encryption for this trunk. The following encryption modes are available:
If "No encryption" is selected, the voice data going via this trunk is not encrypted. If the encryption mode was set to "No encryption" within the server properties, the mode is likewise set to "No encryption" here, and cannot be changed. The field is then deactivated.
When "Encryption preferred" is selected, the voice data is only encrypted if the gateway likewise supports encryption. If this is not the case, the voice data is not encrypted, but phoning is still possible.
When "Encryption mandatory" is selected, voice data encryption is obligatory. This means that either encryption always occurs or the call is aborted with the reason "Incompatible encryption settings". This can be the case, for example, if the gateway does not permit any encryption.
If the encryption mode was set to "No encryption" within the server properties, the mode is likewise set to "No encryption" here; if "Encryption mandatory" was configured there, then the setting "Encryption mandatory" also appears here. In both cases, the mode cannot be changed. The field is then deactivated.
See also 21 Encryption.
Key (PreSharedKey)
To ensure secure communication by SRTP between SwyxServer and gateway, a common key (PreSharedKey) must be defined between them.
For all components which use the SwyxWare database (e.g. SwyxIt! Classic, PhoneMgr, LinkMgr, ConferenceMgr,), this key is automatically generated by SwyxServer and distributed to the relevant component, once again encrypted.
It is different for the SIP gateway trunk. In this case the key must be entered manually. In addition, the key stored here must also be entered on the gateway.
A key length of less than 10 characters is not advisable. Longer keys offer greater security, and keys can be up to 128 characters long. In order to make brute-force or dictionary attacks more difficult, the key should consist of a combination of letters, numbers and special characters.
See also 21.1 Encryption within SwyxWare.
This is how you specify the encryption mode for a SIP link trunk