2.4.10.1 Connect To

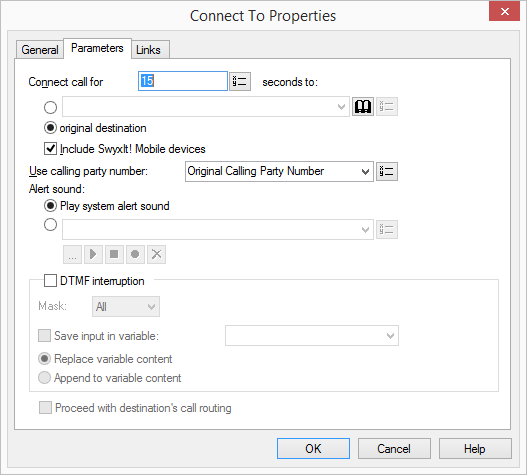
The action „Connect To“ transfers the call to the target telephone number. A time limit (Timeout) limits the time period in which a connection establishment it is tried.
You have the option of playing an announcement (e.g. “your call will be connected”) in the handset instead of a ringing (idle tone).
You define the number in the field "Use for the following number", which in the case of forwarding should be signalled. This can be the number of a user or a group.
Furthermore, in this block you can permit an interruption by a DTMF entry made by the caller. This takes place in the same was as in the block “Play announcement”.
Alternatively, you can activate the checkbox “Proceeding with Call Routing of destination” if the call is to be forwarded to another internal subscriber and the call should be processed according to the rules of this subscriber. In this case, your own set of rules will be ended.
The action is terminated
This is how you define the parameters for Connect To


Only external numbers (e.g. the number of an ISDN telephone or a cellular phone) can be used. If a connection subject to costs is set up while forwarding, then these costs will be charged to you.
After putting the call through with the value "0" for Timeout, the call is no longer available for further processing.
The WAV files, which the administrator has made available to all users, have the extension “(Template)” in the file name. These templates cannot be deleted.
Links
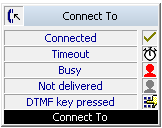
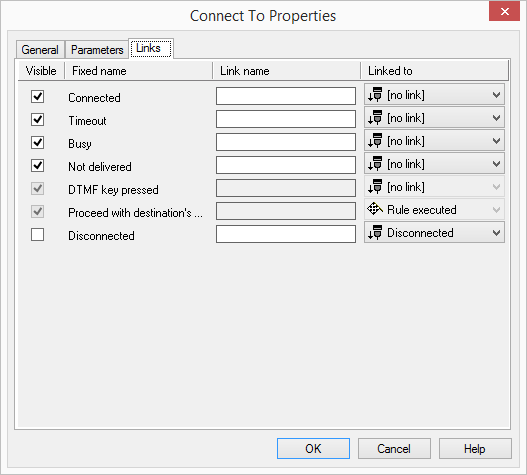
On this tab you will find all outputs associated with this block. The outputs are described as follows:

Output | Explanation |
|---|---|
Connected | This exit is chosen if the call was successfully connected to the destination number. |
Timeout | This exit is chosen if the call could not be connected to the destination number within the Timeout period. |
Busy | This exit is chosen if the destination telephone number is busy. |
Not Delivered | This exit is chosen if the call cannot be connected because the destination subscriber is logged off. |
Get DTMF Char | This exit is selected if a DTMF character is detected during the announcement. |
Proceed with destination's... | This exit is chosen if the call is transfered to the destination. It will further processed according to the destination script. Your own call handling will be ended. |
Disconnected | This exit is chosen if the call was disconnected during the connection process. |
In the first column "Visible", you can define whether each output should be shown in the script window.
The "Visible" column is only used to define the visibility of the links in the script window. This setting helps to maintain the clarity of the script. You cannot remove outputs, i.e. the connections must be kept, otherwise an error will occur in the script.
The second column "Default" contains the default name of the output. This provides information about events during the execution of a block so that additional appropriate connections can be created. This fixed name cannot be changed. You can assign your own identifying names to the various contact surfaces in the column "Link name". This name will later appear in the block in the grid interface.
In the last column "Linked to" you see which block input this output is connected to. Here you have the option of selecting a link from a select list, which contains all available blocks.


