5.4.6 Swyx Control Center with your own SSL certificates
SSL certificates are automatically configured during the installation of the Swyx Control Center. You can also use your own certificate.
How to import your own SSL certificate for Swyx Control Center
1 Search for "Manage computer certificates" in the Windows search bar and open the certificate manager.
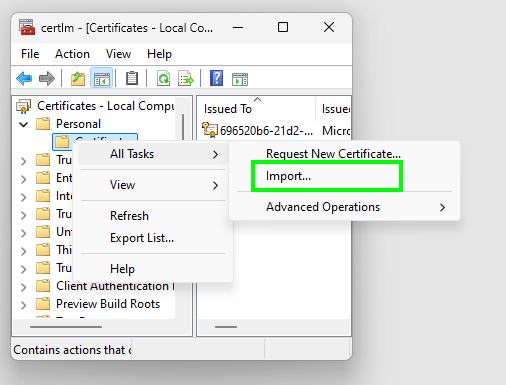
2 Open Certificates - Local Computer | Personal | Certificates.
3 Open Certificates | All tasks | Import... in the context menu.
4 Click on Next.
5 Select the certificate file from the directory and click Next.
6 Leave the ""Personal" area as the storage destination and click Next.
7 Click on Finish.

Your certificate is imported and appears in the
Certificates - Local computer | Personal | Certificates list.
To assign the SSL certificate to the Swyx Control Center port (default: 9443)
You have imported your own SSL certificate.
1 Search for "Manage computer certificates" in the Windows search bar and open the certificate manager.
2 Open Certificates - Local Computer | Personal | Certificates.
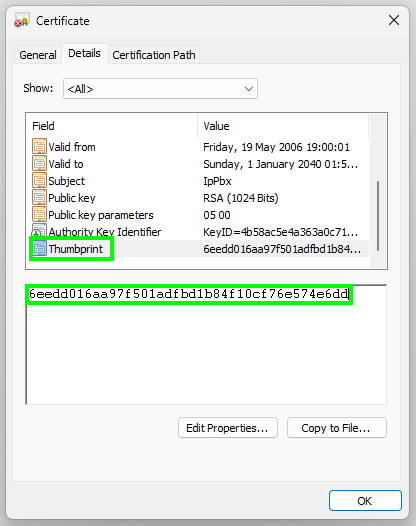
3 Double-click on the imported certificate.
4 Select the Details tab and click on the Thumbprint field.
5 Copy the thumbprint to a text file.
6 Make sure that the copied thumbprint does not contain any trace characters.
7 Start Windows PowerShell as an administrator.
8 Make sure that no SSL certificate is assigned to port 9443, e.g. with the following command:
netsh http show sslcert | Select-String ":9443" -Context 0,10
9 If an SSL certificate is assigned to the target port, check the corresponding details:
Here is an example:
10 You can cancel the assignment of the existing certificate with the following command:
netsh http delete sslcert ipport=0.0.0.0:9443
11 Assign your own SSL certificate to port 9443:
netsh http add sslcert ipport=0.0.0.0:9443 certhash=<Thumbprint> appid="<GUID>"

