Configuration
Swyx WebAccess is set up with the help of a configuration wizard, which guides you through the individual steps.
This is how you configure Swyx WebAccess
1. Open the configuration wizard under "Start | Programs | Swyx WebAccess".
The "Welcome" window will open.
2. Click on ”Next>”.
The "SwyxServer Configuration" window appears
:
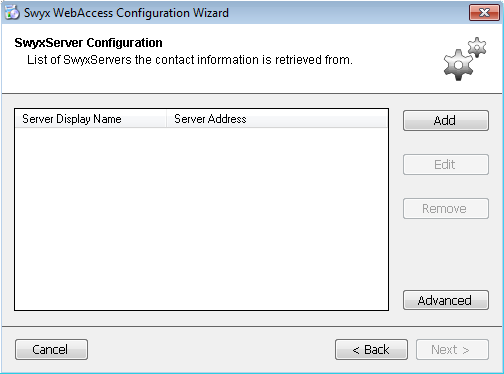
3. Click on the "Add" button to add a new Server.
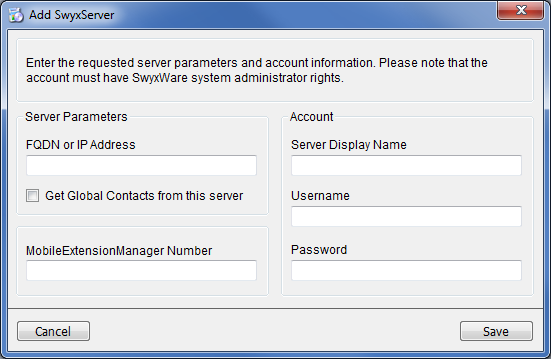
The dialog window "Add SwyxServer" will open:
4. Enter the IP address or the full name (Fully Qualified Domain Name, e.g.: "server.yourcompany.com") of the SwyxServer.

Server Display Name
As "Server Display Name", specify the name under which the SwyxServer will be displayed to the user. Please do not use any special characters in the name, only [A-Z], [a-z], [0-9] and spaces.
Username and Password
Please specify a SwyxIt! user name and the associated password (
see New user account) for the server access.
MobileExtensionManager Number
Specify the added external number of the MobileExtensionManager in the canonical format. This extra number must be created specially to be used only with Swyx WebAccess (
see Configuration of MobileExtensionManager)
Get Global Contacts
Activate the checkbox "Get Global Contacts from this server", if the Global Contacts of this server should be loaded.
| The option "Get Global Contacts" can only be activated for a server. Global contacts of all connected servers are displayed. |
5. Click on "Save" to save the parameters. Click "Cancel" to exit the "Add SwyxServer" dialog window without saving the data.
| Saving the settings can take some time, as all inputs are validated. |
6. In order to configure the advanced options, click on the "Advanced" button.
7. When all SwyxServers are configured, click on "Next>".
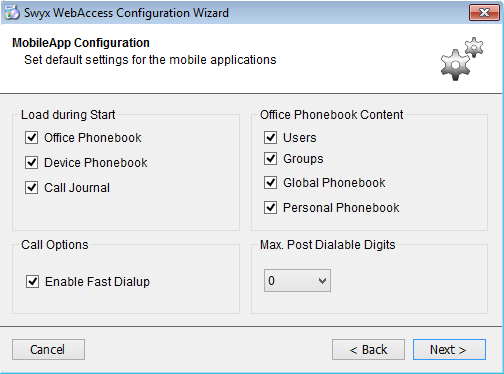
The dialog window "MobileApp configuration" appears:
Here you can define the standard settings for all users. Each user can change these settings individually.
Load during Start
SwyxWare contacts ("office phone book"), the call journal and the contacts that are saved on the smartphone of the user ("Phone contacts“). However, they can also be loaded subsequently by the user.
Call options
By selecting "Enable speed dial", the call set-up time is reduced.
Deactivate this options, if call setup problems occur.
Content of the office phone book.
Define, which phone book lists from SwyxServer are also shown in SwyxIt! Mobile.
Max. number of post dialing digits
Specify the number of post dialing digits.
Post dialable digits are additionally dialed digits which are transmitted directly with a number.
For a call that you want to route via the MobileExtensionManager (MEM), the number of the MEM is dialed first. The number of the person you want to call is normally then transmitted in a DTMF string. In the GSM network in particular, the transmission of DTMF characters takes some time and leads to a delay in the call setup. To speed up the call setup, the destination number can be transmitted wholly or partially as post dialable digits to MEM numbers. Whether and how many post dialable digits can be transmitted is dependent on your company's ISDN connection and on the service provider used. It can thus happen that during a roaming in a foreign cellular network, the number of possible post dialable digits is reduced, and consequently the destination number can no longer be completely transmitted. If necessary, the number of post dialable digits must be reduced until the destination number is again transmitted.
8. Click on ”Next>”.
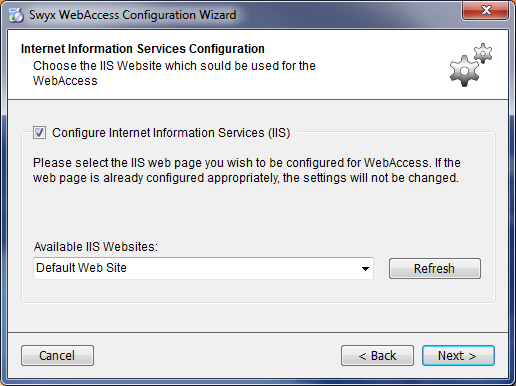
The "Internet Information Services Configuration" dialog window will open:
9. Chose an IIS website to be configured for Swyx WebAccess.
10. Click on Next>.
The "MobileExtensionManager Configuration" dialog window will open:
11. Chose from the list or enter a URL, over which the configured SwyxServer can communicate with the Swyx WebAccess.
12. Click on "Next>" and confirm your settings with "Finish".
As soon as the configuration is saved, the window "Swyx WebAccess has been set up successfully" appears.
| Saving the settings can take some time, as all inputs are validated. |
13. Click on the "Finish" button.
14. Communicate the required URL (e.g. mobile.yourcompany.com) to all users.
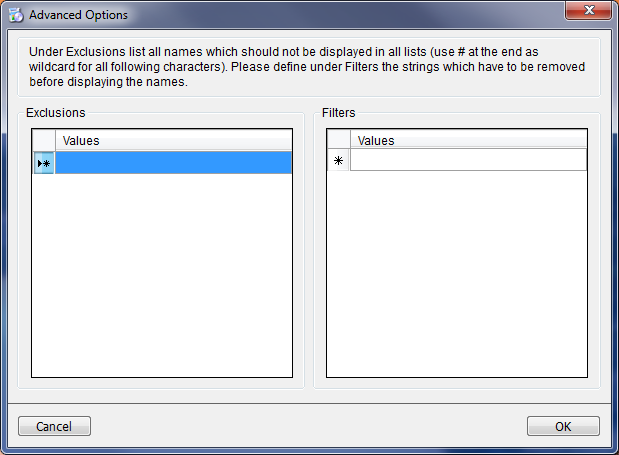
Advanced Options
You open the "Advanced Options" dialog window in the "Swyx WebAccess Configuration Wizard" by clicking on the "Advanced" button.
You have the option of adjusting the display of contacts and caller lists with "Filters". You can remove certain strings from the displayed names. You can strip a name of suffixes, e.g. "(Dortmund)", which often occur on names in an environment with multiple servers.
Under "Exclusions", you can specify all names that should not be displayed.
In defining exclusions, you can use '#' as a wildcard at the end of a word: '#' then replaces all further characters.
E.G. For example, if you enter "Bak#", all those whose names begin with "Bak" will not be shown in the list.