1.6.4.1 General Settings in the "Send Fax" Window
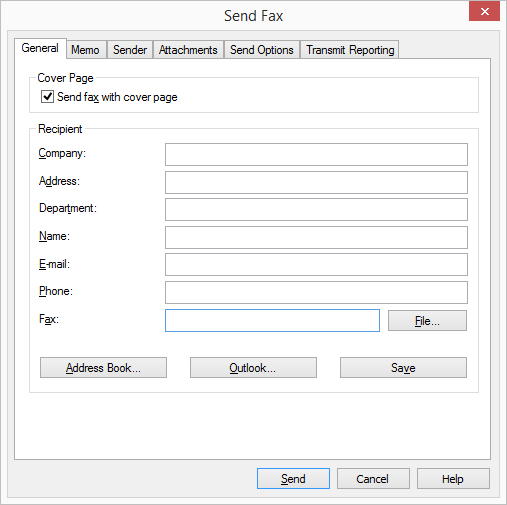
On the "General" tab in the "Send Fax" window, you can define whether the fax should be sent with or without a cover page. You also save or select the recipient information here.

In order to send a fax, it is absolutely essential to enter the fax number and a valid send appointment. If these parameters have not been entered or if they contain invalid values, SwyxFax Client will prompt you to correct the entry by issuing a corresponding error message.
Send Fax with Cover Page
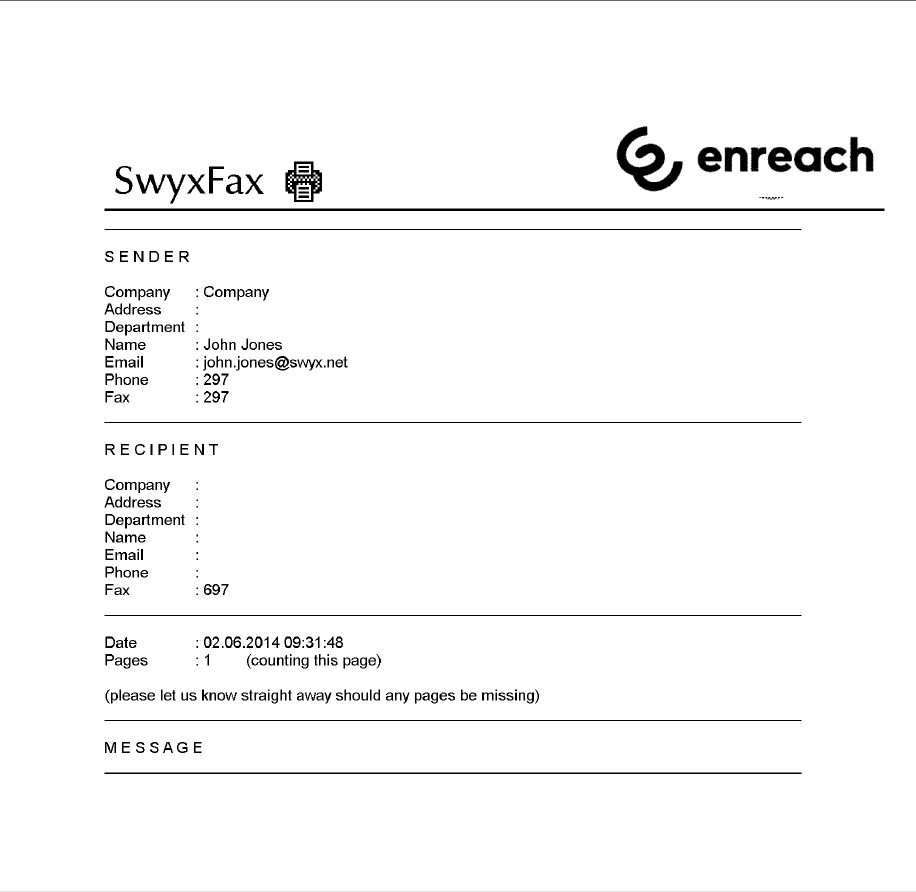
The cover page is a page containing information about the fax sender, fax recipient, and other status information, such as the date, time, and number of pages. You can also add a memo on the cover page.

The cover settings are set by your administrator. For further information see the SwyxWare documentation for administrators.
In the "Cover Page" field you can indicate whether your fax document should be sent with or without a cover page. To do this, activate or deactivate the checkbox "Send fax with cover page". Please note that a Quickfax must have either a cover page or an image.
Entering the Recipient
You can enter the recipient information in different ways, which are described in more detail below.
Manual Entry
Enter the destination number in the "Fax" field using the standard method, including the preceding public line access number (e. g., “0”). You can also use the canonical telephone number format (e. g., +44 (231) 12345-678). In this case you should not use a preceding public line access number.
Address Book
SwyxFax Client provides you with your own Address Book in which you can store fax numbers.
How to select a fax address from the Address Book
Outlook
SwyxFax Client offers you the option of accessing your Outlook contacts directly.
How to select a fax address from the Outlook contacts
Please remember that the selected contact must be a fax number, because e-mail addresses are also shown.
Internal Fax
If you would like to send an internal fax, just enter the extension number in the "Fax" field (without a preceding number for public line access) or the Windows user account of the required recipient. An internal fax is queued on the SwyxFax Server just like a normal fax; however, a number is not dialed when the fax is sent. Instead, the fax is copied internally and made available to the recipient.
Multiple Destination Addresses
You can also send a fax to multiple recipients. To do this, enter the destination numbers, separated by a comma or semicolon, in the "Fax" field. You can select both internal and external fax addressees.
The fax documents to be sent will appear in your fax folder as individual documents. The recipients will not be aware that this fax has been sent to more than one fax address.
Fax Addresses from a File
It is also possible to apply destination addresses from a *.TXT file by clicking on "File…" in the "Send Fax" window. The file must contain the destination number in every line. You can create this type of file using Windows Notepad, for example. If you create the file with a word processing program such as Microsoft Word, remember to choose the "Text Only" file type when saving.