2.6.5.2 Connect To Loop

With this action, an attempt will once again be made to connect a call to a certain destination number. The caller hears another announcement between the individual attempts. If the line is busy, the caller will hear a busy announcement defined by the system administrator.
The action is terminated
 after successful transfer (call has been accepted),if the destination telephone number is busy,by interrupting the connection (e.g. the caller goes on hook)after the defined number of loops has been run through without successAfter entry of a DTMF character (if permitted)after the timeout has expired if the call could not be put through.
Under "Properties", all three tabs "General", "Parameters" and "Connections" tabs are available for this block.
This is how you define the parameters for Connect To Loop
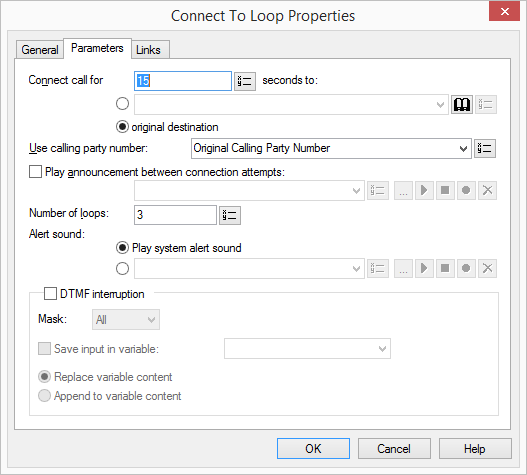
For information on using the phone book and on the subject of "Parallel call signaling", see the SwyxIt! documentation.
 From the dropdown list select a file.Browse your hard drive by clicking on
  .
.When searching, you can also choose a file in MP3 format. Upon selection, the MP3 file will automatically be converted into the WAV format and saved in the database on the SwyxServer. The converted files are therefore available for use later. During the conversion process, the Info dialog "Please wait, the file is being converted into WAV format" will open.
Click on , to listen to the selected file. Click on
  to stop playing the file.To record a new announcement, click on
  : You will now be prompted to enter a file name. The "Start Recording" window will appear. Click on "Start" to begin recording the announcement. Stop recording by clicking on .To delete the selected file, click on
  .
.The WAV files, which the administrator has made available to all users, have the extension "(Template)" in the file name. These templates cannot be deleted.
Links
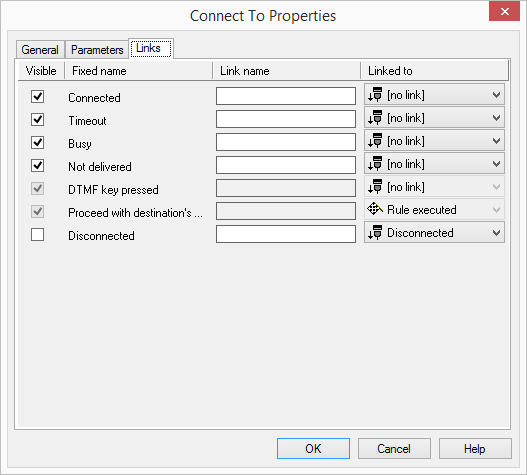
On this tab you will find all outputs associated with this block. The outputs are described as follows:
Output | Explanation |
|---|---|
Connected | This exit is chosen if the call was successfully connected to the destination number. |
Timeout | This exit is chosen if it was not possible to connect the call to the original destination after the repetition, e.g. because the call was not picked up. |
Busy | This exit is chosen if the destination was still busy, even after running the loop. |
Get DTMF Char | This exit is selected if a DTMF character is detected during the announcement. |
Disconnected | This exit is chosen if the call was disconnected during the connection process. |
In the first column "Visible", you can define whether each output should be shown in the script window.
The "Visible" column is only used to define the visibility of the links in the script window. This setting helps to maintain the clarity of the script. You cannot remove outputs, i.e. the connections must be kept, otherwise an error will occur in the script.
The second column "Default" contains the default name of the output. This provides information about events during the execution of a block so that additional appropriate connections can be created. This fixed name cannot be changed. You can assign your own identifying names to the various contact surfaces in the column "Link name". This name will later appear in the block in the grid interface.
In the last column "Linked to" you see which block input this output is connected to. Here you have the option of selecting a link from a select list, which contains all available blocks.