11.2.1.1 The "Administration" Tab
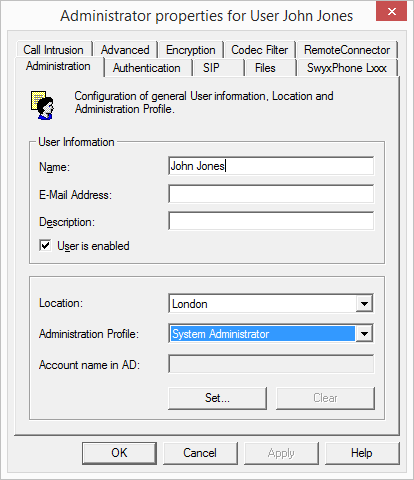
User Information
The "Name" field is used to define the display name of the Swyx user. The name is used for various displays on the SwyxIt! Classic interface and in Swyx Administration. In addition, this name can be entered directly in SwyxIt! Classic to call this Swyx user.
Please note that the username must be unique within Swyx; that is, there must be no other user with that name, nor any SwyxGate, SwyxLink, group, or external phone book entry. This is verified by Swyx Administration.
In the "Email Address:" field, you must enter the email address that is set up on the company's email server as the primary email address for the corresponding user.
Configuring an email address in this field enables the integration of Swyx status information and telephony features into Microsoft 365. See also help.enreach.com/controlcenter/latest.version/web/Swyx/en-US/#context/help/Entra_ID
In the user list, check that all entries in the "e-mail address" column are correct, thereby guaranteeing integration in MS Office.
Status signaling between different Swyx locations requires additional configuration. See 17 SwyxLink (Server-Server Connection).
More detailed information on the user can be entered in the "Description" field. However, Swyx does not analyze the field's contents in any way.
The "User is active" checkbox allows you to temporarily exclude a user from Swyx without deleting them outright. The user will then be rejected the next time he or she attempts to log in.
Location
Each Swyx user is assigned a location. This location determines the country and area code, prefixes, public line access prefix(es) and the time zone.
See 8 Locations.
Administration profile
Each user is assigned an administrator profile (default: Not administrator). The administrator profile determines which permissions this user has when connecting to SwyxServer using Swyx Administration. Depending on the profile he can e. g. create or change users or edit phonebooks.
AD Account Name
Enter here the user account in the Windows user administration (Active Directory), which is assigned to this user. Click on "Set..." to select a user account. A new window opens up, in which you can search for the user and verify the entries.