11.6 Configure users in the Windows user administration
|
|
This function is not available for SwyxON.
|
Swyx users can be managed in Windows User Management. There you can

when creating a new Windows domain user (Active Directory Users and Computers), create an associated Swyx user directly and assign basic Swyx parameters to that user, such as name and phone number
assign corresponding Swyx users to the existing Windows users
chhange basic Swyx parameters in Windows User Management
when deleting a Windows user account, directly remove the associated Swyx user
|
|
When users are created or edited in Windows user administration, this is usually done on an administrator's workstation computer. To display the corresponding Swyx tabs or pages of the wizard, please install the "AD Integration" component of Swyx Administration on this workstation. The installation of the Active Directory enhancement with the SwyxServer simply expands the AD database with the relevant fields; it does not provide an interface. The scheme of the Active Directory won't be changed.
|
Assign Swyx Users when creating a Windows User
When creating a new Windows user, additional pages appear in the wizard that prompt you to enter the basic Swyx parameters.
This is how you create a new user in the Windows user administration.
1 In the user administration, select in the "User" context menu the entry "New". A wizard will guide you through the relevant steps. The following section describes only the steps required to create an associated Swyx user.
2 Swyx usernames and a description
Here, you can also uncheck the "Create associated SwyxWare user" checkbox.
If the checkbox is activated, the SwyxServer is contacted.
In the first logon to SwyxServer, the logon parameters (Windows authentication or user name and password) are checked and stored, so that a further logon takes place automatically. Please note that the rights for creating new users are required (
9.3 Administration profiles).
You can also assign an existing Swyx user to the new Windows user here. In this case the other parameters are not queried.
3 Internal Numbers
Enter the internal number for this user here.
Use "Verify" to immediately check whether this number has already been assigned.
Clicking on "Next unused" will automatically assign the next unused internal number to the user. You can also enter a number, e. g. 210, in order to leave the number range below untouched. Clicking on "Next unused" will then assign the next unused internal number. "Check" lets you check whether an entered internal number is already present.
Activate the checkbox "Show in Phonebook" if this number is to be listed in the Global Phonebook. Name resolution is always performed, regardless of whether the user is entered in the Global Phonebook.
4 Mapped public numbers
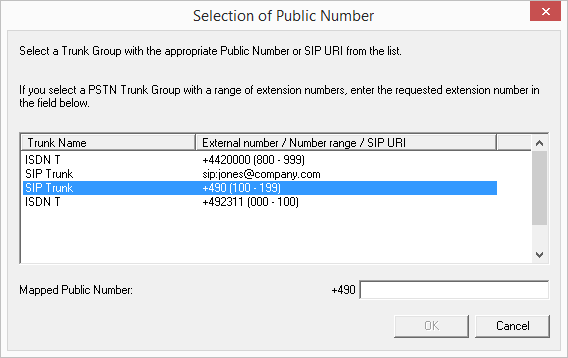
If the internal number is to be reachable from the public telephone network, it must be mapped to an external number. You can enter this public number directly in the field or click "Select...".
The "Choose public number" window will appear.
Select the SIP URI or public number here.
If the public number is to be taken from a numbers range, double-click on that range.
Assign the external number in the "Mapped Public Number:" field and click "OK".
5 SwyxIt! Classic and SwyxFax Client are automatically assigned to the user. The logon configured here is via the associated Windows user account. See
11.2.1.1 The "Administration" Tab.
6 SIP Devices
Activate the checkbox, if you want to allow the registration with a SIP capable device. This option is deactivated by default.
Enter the following user information. Specify whether the authentication mode is chosen according to the server standard settings, or whether authentication should always or never take place. If authentication is required, enter here the necessary data for authentication, such as the user name and the password. These do not have to be the same as the Swyx username and password you may have configured to log in with SwyxIt! Classic.
7 SwyxPhone Lxxx
Allow the logon with a SwyxPhone Lxxx.
Assign the user a PIN, with which he logs in to the SwyxServer. This PIN must contain between 1 and 16 digits.
8 Internal SwyxFax Numbers
Enter the internal fax number for this user here.
Use "Verify" to immediately check whether this fax number has already been assigned.
Clicking on "Next unused" will automatically assign the next unused internal fax number to the user.
9 Mapped public fax numbers
If the user also receives faxes from the public telephone network, an external fax number has to be assigned to the internal fax number. You can enter this public fax number directly in the field or click "Select...".
10 Mobile number
Enter the mobile number of the user in canonical number format.
11 E-mail address:
The user must have a unique email address. You must enter the email address that is set as the user's primary email address.
This e-mail address is also the default setting for delivering voice messages. The Voice Box email address can be configured by the user or in Swyx Administration in the "Forwarding" dialog; see
11.2.5.4 Standard Voice Box" tab.
| A configuration of the special Voice Box e-mail address has no influence on the existing e-mail address that was created for the integration in MS Office. |
12 Further parameters are created as standard:

Location
As location, the default location is assigned to the new user.
Call Permission
Feature Profile
13 The AD Configuration Wizard overview provides a summary of the Swyx parameters configured here.
Assign Swyx Users to Existing Windows Users
In Windows User Management, a Swyx user can be assigned to an existing Windows user.
How to Assign a Swyx User to a Windows User
1 Open the Windows user administration.
2 In the user's context menu, open the Properties and go to the "SwyxWare" tab.
3 You have several different options:
Select an existing Swyx user from the list. In this case, the Swyx user is assigned the corresponding Windows user account.
or
Changing Swyx User Data in Windows Management
You can also change basic parameters—such as a Swyx user's location or job description—from the Windows User Management console.
How to Change a Swyx User's Settings in User Management
1 Open the Windows user administration.
2 In the user's context menu, open the Properties and go to the "SwyxWare" tab.
3 You can change the following parameters here:
Swyx Username
Location
Call Permission
Feature Profile
4 Click "SwyxWare Administration..." to open Swyx Administration and configure additional settings for the user, such as call routing scripts.
Deleting an Associated Swyx User or the Link
In Windows User Management, you can either delete a Swyx user or simply remove the link between the Windows user and the Swyx user.
How to Delete a Swyx User in User Management
1 Open the Windows user administration.
2 In the user's context menu, open the Properties and go to the "SwyxWare" tab.
3 Uncheck the "Is SwyxWare User" checkbox.
4 A prompt will appear asking whether you want to completely remove the Swyx user or unlink it from this Windows user.
5 After confirmation with "OK", the user or link is removed.