When you have created a new Skin element "SwyxIt! Web Extension", you first have to configure it. You can select various options in this.
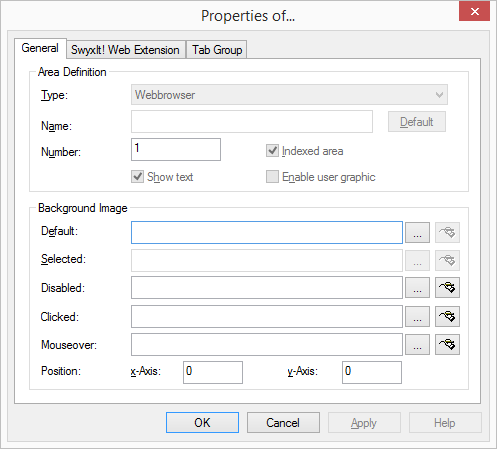
On the “General” tab, you can set general options such as the position and the background image.
On the tab “SwyxIt! Web Extension“ you can specify additional options such as the URL to be shown in the browser area and the event for which the Web content is loaded; or you can link the content to a specific line. You can also specify whether the contents should be displayed in a separate browser window or within the browser area defined on the skin.
You can configure the SwyxIt! Web Extension in such a way that different browser content is shown depending on the circumstances. See also 18.2.27.3 Events.
You can specify a background image and the position of the SwyxIt! Web Extension on the Skin.
To define the general settings for the SwyxIt! Web Extension
1 In "Area Definition", enter a line number in the "Number" field if you want to link a URL to a line button. Otherwise leave the "0" there.
You cannot change the other two fields in the "Area Definition" box.
2 The graphic file to be used as the background can be specified in the “Normal” field located under “Background image”.
Click on to search for the appropriate files.
Click on to edit the selected graphic using the linked graphic application.
3 Under “Position”, in the “x‑Axis” and “y-Axis” fields, you can define the coordinates of the SwyxIt! Web Extension within the SwyxIt! Classic interface. The zero point of the coordinate system lies in the upper left corner.
It is not possible to change other fields for the SwyxIt! Web Extension.
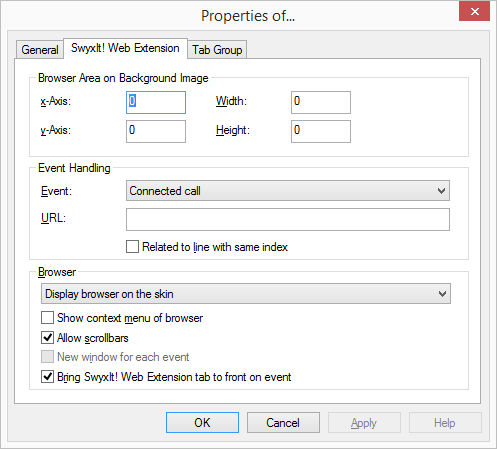
The Tab "SwyxIt! Web Extension"
You can define further properties for the SwyxIt! Web Extension on this tab:
the size and position of the browser area within the SwyxIt! Web Extension
the URL that should be shown in the browser area
the event for which the Web content is loaded
linking of the content to a specific line
use of the context menu (context menu) in the browser area
display of scrollbars in the browser area
open a new window per event
SwyxIt! Web Extension on top in case of event
To change the properties of the SwyxIt! Web Extension
1 Click on the SwyxIt! Web Extension. The "Properties of…" dialog field will appear.
2 Choose the "SwyxIt! Web Extension" tab.
3 Now enter the coordinates for the browser area within the SwyxIt! Web Extension. This area is initially highlighted with a yellow line in the Skin Editor.
4 Now select from the list the event upon which the URL is loaded. Then enter the URL for this event.
You can also specify various events, for each of which a different URL is called up. See also 18.2.27.3 Events.
5 If you want to link the SwyxIt! Web Extension to a specific line, activate the checkbox "Related to line with same index". You then have to enter the number of the line in the "Number" field on the "General" tab.
6 If you activate the checkbox "Show context menu of browser", the context menu of the browser (Internet Explorer) will be used. If you deactivate this option, no context menu is available in the browser area.
7 If you activate the checkbox "Allow scrollbars", scrollbars will be displayed when the Web content is larger than the window.
8 Web Extension on top in case of event", the tab containing the web content will be displayed on top of the skin, as soon as the event starts.SwyxIt! Web Extension
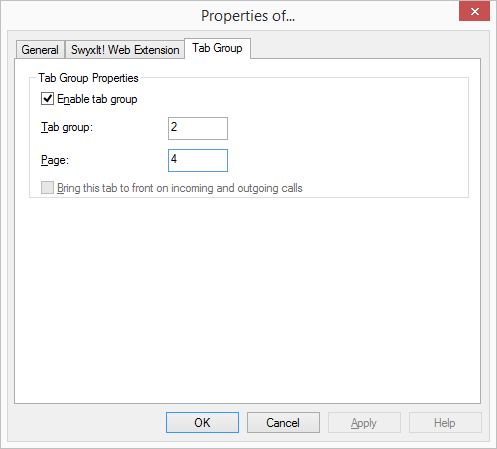
The “Tabs” tab
You can group SwyxIt! Web Extension elements on tabs. You must give the information on the group and page for each element that is to be positioned on a tab.
Before you assign the group and page information for the tab for individual skin elements, you should first create the tab elements with the group and page information.
 to edit the selected graphic using the linked graphic application.